
Building an Angular Application with the Nx Workspace

Lifelong Learner | Front-End Engineer | Code x Coffee
A scalable Angular application requires the appropriate structure and pattern.
Enter Nx workspace.
It's a tool suite that assists you in building, managing, and maintaining a monorepo at any scale. Nx also allows you to design your codebase to hold multiple reusable libraries and scale quickly across different applications.
Nx comes with right-off-the-bat support for frontend frameworks like React and Angular and backend technologies like Nest, Express, and Next.
In this guide, you will learn the following:
- What is a monorepo?
- How to create an Nx workspace for an Angular project
- Nx CLI
- Leveraging NX features in Angular
But first, let's understand what a monorepo is.
What's a Monorepo?
A monorepo is a single repository that holds many applications and libraries. It's accompanied by tools that allow you to work with your applications and defined projects. This strategy has several advantages:
- Developer mobility: Working with a monorepo allows you to employ a one-way strategy of executing similar tasks when working with different technologies. This means a team of developers can contribute to other projects with the changes synced across the organization.
- Atomic changes: A monorepo allows developers to seamlessly make changes affecting multiple projects. For instance, a dependency change may need to be reflected on server and client apps. With monorepo, you can make these changes in one commit on one repository, increasing team efficiency.
- Dependency version: By working with a single repository with a specific dependency version, we can ensure our entire codebase is dependent on that particular version. This way, we eliminate the chances of creating version conflicts.
Learn more about monorepos.
Monorepo: Why Nx?
Even though several systems support monorepo support, Nx provides the full spectrum, allowing for a better preconfigured with continuous incremental adoption. Working with Nx means, you configure once, then focus on building your tools and apps. In addition, Nx efficiently manages configuration around APIs, micro frontends, and libraries of tools.
So, how exactly does Nx compare against other monorepo tools?
| Task/Tool | Distributed Task Execution | Workspace analysis | Consistent tooling | Source code sharing |
| Nx | Yes | Yes | Yes | Yes |
| Bazel | Yes | Yes | Yes | Yes |
| Gradle | Yes | Yes | Yes | Yes |
| Lage | No | Yes | No | Yes |
| Lerna | Yes | Yes | No | Yes |
| Turborepo | No | Yes | No | Yes |
Creating an Nx Workspace
We’ve dived deep into monorepos.
With that in mind, how exactly do we create one using Nx Workspace to work in an Angular application?
You may have encountered the Angular CLI if you've worked with Angular. Nx uses its CLI that does all the heavy work for us. With the command below, you can create a new workspace that wraps your Angular project for you:
npx create-nx-workspace@latest
After set-up, the CLI will prompt you for several responses.
Package-based and integrated: With package-based, Nx allows you to create your set-up. Nx will speed things up and allow you to run things your way. Using integrated means Nx gives you a preconfigured set-up. This way, you can focus on shipping your features as Nx configures your Angular framework.
What app to create (In our case, we'll choose Angular)
Repository name
App name
Stylesheet format
Enable distributed caching, which makes your CI faster (in our case, choose No)
The format should look something like this:
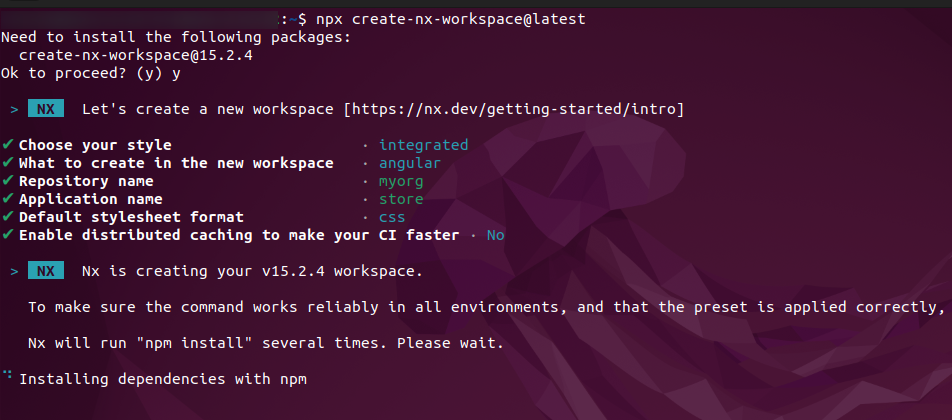
After executing everything, Nx will take a few minutes to set everything up. Once done, you'll have a brand new project ready. By default, Nx will use the following:
Jest for testing
Cypress for end-to-end (e2e) testing
EsLint for linting
These are modern tools, and I highly recommend working with them as they provide a fantastic developer experience. They also have active teams maintaining them.
Let's look at the base structure of our project:
apps/
  - {{store}} - App name
  - {{store}}-e2e
libs
tools
apps/: By default, this is where Nx stores all application projects, in addition to an e2e testing applibs: All libraries go heretools: all the needed tooling scripts for the project go hereAll other necessary root configurations like
node modules,JSON files, config files for Jest, etc
The entire structure is created for you to focus on building the product from the beginning.
Migrating from an Existing Angular Project
Nx allows you to add a workspace to an existing Angular project. However, it gets complex if you're trying to migrate more than one Angular application in a project. To migrate a single Angular app, use the following command:
ng add @nrwl/workspace
This will generate all the necessary dependencies Nx requires and build the folder structure discussed above. Nx also migrates your app into the apps/ folder and e2e app into the apps/{{appName}}-e2e folder. Additionally, Nx redesigns the package.json script and modifies Angular CLI so you can use commands such as ng build, ng serve, or npm start.
It's also critical to note that the version of Angular and Nx must match for this to work efficiently. For instance, if your project uses version 14 Angular, ensure to use the latest 14.5.4 version of Nx CLI.
Working with the Nx CLI
The Nx CLI allows you to perform different operations using a set of commands. To install Nx globally on your environment, run the following command:
npm install nx --global
yarn global add nx
Build a Library
The Nx Workspace monorepo allows developers to structure the codebase into small, manageable libraries. With Nx, you can create a library easily by typing the command below in the terminal.
nx g @nrwl/angular:lib mylib
This creates a libs/mylib folder with the library configured so you can build, test, and use it in your applications or other libraries. Sometimes, you may want to group the libraries together for better access and efficiency. To achieve this, use the --directory={{subfolderName}} parameter to identify a subfolder where a library is created. If you’re unsure where to place your library, you can use the @nrwl/workspace:move schematics to move it.
Any library you create will have an index.ts file at the root, which acts as the access point to the library. For instance, if you want a part of the library to merge with the libs public API, it should only be exported from this file. Anything else is private to the library.
Conclusion
The Nx Workspace monorepo has many benefits and provides you with a set of tools to help build your applications. By working with it, you can speed your development process by making incremental changes to the repository and ensuring that your changes are synced with the entire workspace.
Get started with Nx Workspace monorepo today.


